

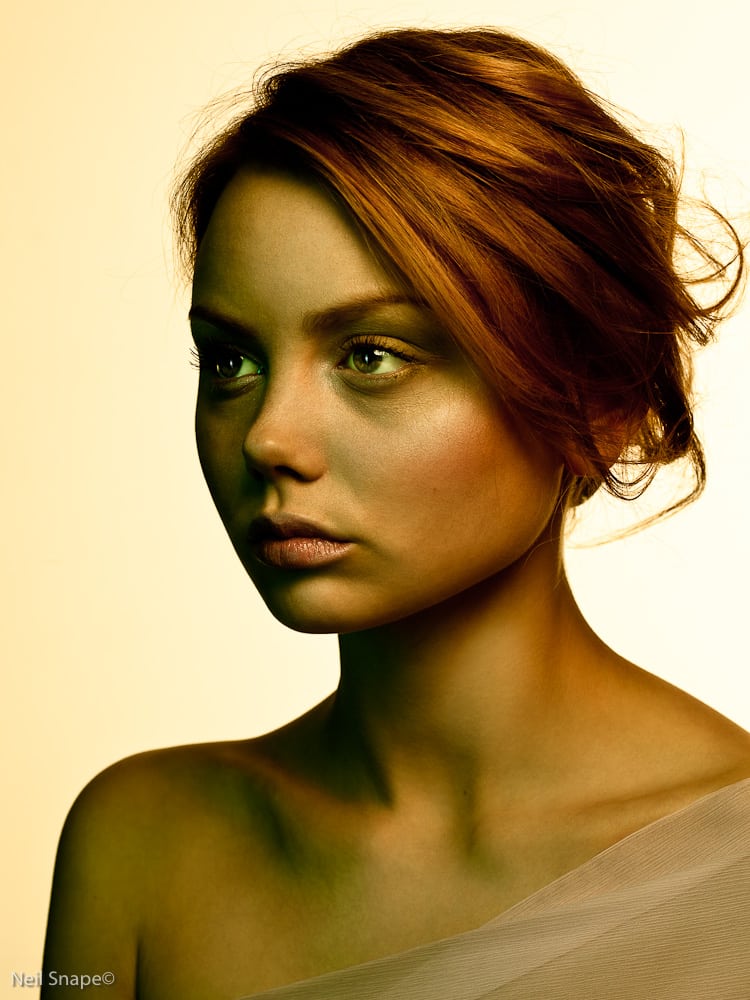
As drab as it may seem the original was intentionally shot this way. Leaving headroom in the highlights avoids clipping the channels when you do extreme conversions from raw, and betters your chances for banding free edits in Photoshop or for production.
Light: start off with a beauty dish. You can see by the shadows it was about 40º high and to her right. It was turned towards the camera as seen by the trailing shadow on her nose, and turned downwards to avoid a hot spot on her head.
The reflection in the eye reveals the BD ( beauty dish) had two barn doors and a lot of black cinefoil around it.
Why?
As soon as you angle a BD down or towards the camera you’ll need to remove or reduce the changed centre of light. To reduce the light on the forehead is usually the easiest, just clip a barn door on the top and closest edge.
Then for the rest you need to watch to see where the light is strongest, and try to cut that too. In this case black cinefoil crimped onto the BD extended to approx. 4” from the edge made the difference. Then it was a matter of moving the light back and forth to find the sweet spot. That was about 3’ from the nose at 40º.
There is a strip light with a Peacock (Lee) filter taped to the strip light turned to her shadow side. It is relatively close approx. 5’ and not spilling on the background, nor too much towards the subject highlight side. The goal is just fill the shadows with colour.
One 2×3’ mat silver reflector card from centre and below pointing up to fill in the eye brows with a little accent on the make up . It is placed at an angle that doesn’t kill the chin shadows, so be careful to preserve the direction of the main light!
Background.: to define the edges it is always best to add a second light. Or two. Being lazy I just turned a strip light 155x40cm Broncolor on the right and behind the subject towards the opposite wall. I also backed up a BD but pointed that at the shadow side wall with a reduced power. I liked the returning jaw edge light with the higher powered right strip so left it there. IF the hair is down this wouldn’t make sense, and you could reverse the graduation with the face shadowed side being the wall / background lighter side.
I could have used a normal or gridded BD above the hair and straight down with a gel to add a bit more coloration. I didn’t this time but often do.


LR SETTINGS.
See attached jpg.

After editing out bumps etc in Photoshop a virtual copy of the psd was made and the following settings other than a crop, were made: Basic
+2 Tint, exposure +0.10, Clarity +9, Vibrance +2, Saturation -5;
Tone Curve: Hl +33, L +11, Darks -3, Shadows -3
Some dodge and burn inside LightRoom too on the raw, then on the virtual copy.
4 thoughts on “How did you do that? Series on Beauty Photography by Neil Snape”
After years waiting, you have a “How to” page with content 🙂 AWESOME!
Over the years your work has inspired me and has pushed me to be better and better at what I do. Your images have set the bar for any photographer to meet. For over 6 years your work has been my see fu. Thank you Neil.
this is great, thanks a lot.
Very nice, especially for the fact that it’s all done in lightroom. Love it and thanks for the tut!
Super blog Neil, glad I’ve found it.
Lighting and PP are my two weakest areas, and your tips will come in most useful.