

Here is a simple image , easier to do than most others.
I want to show you that with very little equipment you can produce excellent results.
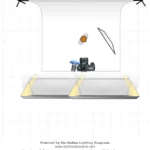
This setting is nothing more than large window light coming from behind the camera in a medium sized room with white walls. The light that day was grey, overcast, yet not raining. The windows were a walk through double door, and windows on both sides of the doors.
The other light to add a sparkle and volume I set a large bowl on a flash head ( P65) with barn doors to be able to limit the lights coverage. The tungsten halogen bulb is 650w max although I adjusted down to what made for a WYSIWYG balance. The light is slightly high and to the left of camera but directly beside the camera . Distance not more than 1m or 3-4′.That is the joy of continuous and ambient light.
The trick to this is filter the light , which is tungsten to become daylight. For this we use what we call full carat, or full correction blue filters often labelled as 80B. It has to be on the continuous light as the other light is daylight already. As expected a grey day, the colour of light will be variable and a lot more blue than if it was sunny.
When shooting with cloudy skies and mixing filtered tungsten, it’s best to use a tripod to reduce the number of rejects due to camera movement. To keep the notions of softness you can then shoot at the chosen aperture, and raise the ISO a little to avoid long exposures.
There is a Polystyrene board with the white side turned towards the shadow side of her face to the camera right at around the same distance as the girl is to the camera adjusted to fill but not destroy nor create double shadows.
Shot at ISO 200 1/45th at f4.0 with a 100mm f2.8 Macro on a 5DMKII.
It could have been at ISO 400 too at 1/90th with little difference.
Let’s see how it was developed and processed.
First off the raw file CR2 is a little underexposed. I’m finding the Canon files when shooting to a white are better underexposed as when correctly exposed there are problems in the light tones that are not easily changed or corrected. I think this is because when near the brightest points of capture, the differences in skin tone then become too hard to have separation , hence colour banding or coloration a problem. I’ve seen this on others files, so I assume it’s a question for hardware limitation.
Once entered , actually shot tethered into LightRoom, my base metadata template adds copyright information, keywords, renames files. I always do a couple of test shots and find a preset that looks good, then tweak that and save it out as a new preset. Then it is very easy to set the development settings to this for making the previews of all incoming images set to this preview. It is not permanent, only a set of controls you chose to create a look from the untouched raw files.
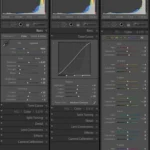
Adding the preset to make the raws lighter by 0.55 + exposure, a bit of magenta tint +7 to the grey blue daylight, some fill +0.7, reduce blacks from the default of 5 to 3, lots of clarity +23, some added vibrance +7, saturation -2.
Tone curve +9 highlights, +5 lights, -3 darks, and +19 shadows. Some corrections in colour are also needed, see screen captures.
All are recorded in the screen captures and preset in the zip at the end of the tutorial.
Then off to Photoshop for pixel level clean up. There was very little, just some spotting with the spot healing brush, a quick mask around the eyes to brighten and increase contrast. I also say there was too much yellow in the skin tones so a curves adjustment layer with the blue channel targeted to reduce the yellow slightly.
There is just a quick dodge and burn done on a soft light layer with light and dark greys but this could be done just as easily in LR before or after editing.
Save out and return to LightRoom. Make a virtual copy. You can rename the copy in the metadata section of the Library module if you want to keep track of which is which.
Apply some further edits on this virtual copy of the file. I save out as PSD , but some say layered TIFFs would be a safer bet. However I have confidence in Adobe being around for a long time!
The advantage of making a virtual copy of a file is that if you further edit the original, a choice you have if you re-export or edit, you can work on the original and not a copy including the LR adjustments. When you save this original again , the edits are reflected in all virtual copies thereafter. Hence, your further tweaks in LR development adjustments are preserved meanwhile if you change say some hair or the clothes, these changes are updated on all virtual copies!
After returning to LR, the control set added are visual tweaks for a pleasing result. No right or wrong , simply pleasing visual results. I added +1 blacks, a small change, but added a huge change in the tone controls.
+7 highlights, 0 lights, +31 darks, and -94 shadows. The region sliders were also changed to affect with a bias the selected sliders. Those are the triangles under the curve graph which you can move to enlarge or reduce the region width and the middle slider gamma.
For a more pronounced effect, I also played with a high contrast almost silhouetted image.
Here the settings are quite whacked: temp +11, tint +34, exposure -0.10, recovery 22, fill light +73, blacks +59.
Clarity +41 vibrance -27, saturation -46. Tone controls, highlights +13, lights -25, darks -35, shadows -43.
Colour blue H -44 S +13 L -60 purple H +77 S -92 L -27 magenta H +35 S 0 L +46
There are no limits. Make as many virtual copies as you like and play until you find your magic.
On Mac the presets are saved in your home pictures folder ~Pictures/LightRoom/Lightroom Settings/User Presets
The files in the zip if placed there will be in your presets after relaunching LR.
Click here for the zip with the presets.
3 thoughts on ““How did you do that?” number 3 Series on Beauty Photography by Neil Snape daylight and tungsten”
Thanks for sharing this! I’m not sure what this tungsten light is, if I understand correct you mounted a Tungsten halogen bulb/continuous light on a flash head? Can I do this with a monolight and get 650W continuous light?
Yes any hard tungsten halogen will do between 300-650w
You are the man. To have our lives docemunted by you is a true blessing. These will last forever.